My buckles are being featured on Scoutie Girl, a really nice blog about handmade crafts:
http://www.scoutiegirl.com/2009/01/link-mini-steel-belt-buckles.html

Thursday, January 29, 2009


Monday, January 5, 2009
Ornamental Wrought Iron Videos
I found this great series of videos on Youtube. The first time I saw this video was at my very first blacksmithing class with David Norrie a couple of years ago. This video shows David and several other talented blacksmiths making a reproduction of a beautiful iron gate designed by the great Samuel Yellin.
The video provides an excellent overview of blacksmithing techniques. It's also really exciting to see so many smiths working together under the supervision of the late Francis Whitaker, one of America's most famous blacksmiths. Make sure to check out all six of the videos!
Ornamental Wrought Iron Part 1
The video provides an excellent overview of blacksmithing techniques. It's also really exciting to see so many smiths working together under the supervision of the late Francis Whitaker, one of America's most famous blacksmiths. Make sure to check out all six of the videos!
Ornamental Wrought Iron Part 1
Saturday, December 20, 2008
Basic Forging: Drawing Out
Forging hot iron is the core of blacksmithing. When iron is hot, it becomes soft and malleable, like a piece of clay.
One of the first techniques most blacksmiths learn is “drawing out.” Drawing out means to lengthen a piece of steel by heating it in a forge and hammer it on the anvil.
Here are some pictures and a video of me drawing out a piece of ½” square mild steel.
This is the 1/2" bar stock:

Once it's hot, the steel is hammered at an angle to draw it out:

For this example, I kept the square shape and drew it out to a point:

Here's the video:
One of the first techniques most blacksmiths learn is “drawing out.” Drawing out means to lengthen a piece of steel by heating it in a forge and hammer it on the anvil.
Here are some pictures and a video of me drawing out a piece of ½” square mild steel.
This is the 1/2" bar stock:

Once it's hot, the steel is hammered at an angle to draw it out:

For this example, I kept the square shape and drew it out to a point:

Here's the video:
Sunday, November 30, 2008
The Winter Garden
We had our first real snowfall of the season today. I snapped a picture of the garden gate and fence in my backyard collecting snow. It's hard to believe that only a month and a half ago, you could barely see the fence at all because the tomatoes were so huge.

I built this gate and fence using no modern welding. Not that there's anything wrong with welding, I just really enjoy doing things the old fashioned way when I can. I needed a gate and fence to keep our dog out of the garden, but I also wanted to create a garden fencing system that could be easily installed by a customer.

I built this gate and fence using no modern welding. Not that there's anything wrong with welding, I just really enjoy doing things the old fashioned way when I can. I needed a gate and fence to keep our dog out of the garden, but I also wanted to create a garden fencing system that could be easily installed by a customer.
Thursday, November 20, 2008
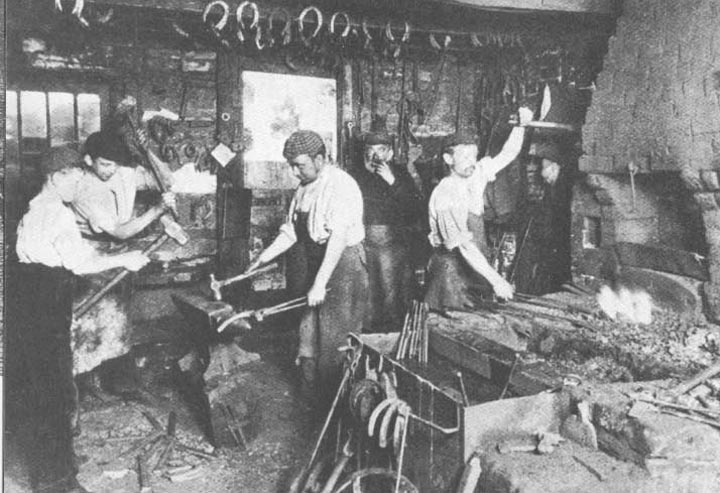
Old Time Blacksmith Shops
Check out these cool pictures I found of blacksmith shops from the old days. As you can see, not that much has changed except that most of us now use gas forges and power tools:




Monday, October 20, 2008
Blacksmith's Tools
 Here are a couple of the hand tools that I use everyday. Pictured below is a Lufkin rule. It is one of the most important tools in my shop. Without it, I'm like a ship with no captain. Tape measures are okay, but for blacksmithing, a steel rule is so much nicer. Plus, if you flip it over and measure a circle, the fine print tells you what length of bar stock you need to make the circle.
Next is the hammer I made. I wanted a shorter, stubbier hammer like a Habermann or Hofi hammer. With a stubbier hammer, you strike the metal with more of a punching blow. I find this style of hammer a lot easier to use and it doesn't wear me out as quickly as a traditional blacksmithing hammer. Some people don't like them, but this style of hammer is my favorite.
The problem was that a Hofi Hammer costs over $100, and a Habermann Hammer is only a little cheaper. There are some other options, but the only other hammer of this style I could find for a reasonable price weighs in at 2 lbs - little smaller than I like for my main forging hammer.
So, I ran down to Home Depot and bought a Stanley "blacksmith" hammer. It's horribly balanced and comes with a junky plastic handle. But, it's still made of nice tool steel and weighs over 4 lbs. So, I figured if I cut it down, it would weigh somewhere in the ballpark of 3 lbs - the weight I like for my forging hammer.
After a little cutting, grinding, and tempering - voila! I call it the "Home Depot Habermann." It only cost me about $20 and is so much more comfortable than the hammer I used to use.

Plus it comes with this helpful reminder:

I also make my own tongs. Once you get the metal hot, you need something to grab it with. That's where tongs come into play. Tongs can be bought, but making tongs for a specific task is a great blacksmithing exercise and saves a bunch of money. It's also very satisfying to do work with tools you made yourself.

Pictured from left to right are: pickup tongs to grab various stock sizes, box jaw tongs for holding 1" wide flat bar stock, angle jaw tongs for holding scrolls, and tongs for closing hot collars. If you are new to blacksmithing, I will explain some of the terminology in upcoming blog entries.

Now that you are familiar with my shop and some basic blacksmithing tools, next up will be some blacksmithing!
Monday, October 13, 2008
Shop Tour (Part 2)
Let's pick up where we left off in Part I ...
This is my leg vise. Gotta have one of these. By the way some of my tools are very old - this vise may well be over 100 years old, I'm not sure.

This is my layout table:

Next is the chop saw. It doesn't get as much use now that I have the horizontal bandsaw, but it still comes in handy a lot.

Here's my drill press:

Next is my old 400 amp Miller stick welder. It has a lot of power and still works great.

This is the welding area & a small Mig welder:

This is probably my favorite tool - the flypress. It can do so many things, I could go on forever. I still find new ways to use it all the time.

Here are my sanders. I use them to deburr and sometimes reshape steel.

In the back area, I have my old Logan 10" lathe. It's seen a lot of use, but it's more than accurate enough for my purposes.

Finally, there's my little air compressor, surrounded by a bunch of projects. In the foreground, you can see the motorized beach cruiser I built- more on that later.

That about does it for the shop tour. Hope you enjoyed checking it out! Soon I'll show you how I use everything...
This is my leg vise. Gotta have one of these. By the way some of my tools are very old - this vise may well be over 100 years old, I'm not sure.

This is my layout table:

Next is the chop saw. It doesn't get as much use now that I have the horizontal bandsaw, but it still comes in handy a lot.

Here's my drill press:

Next is my old 400 amp Miller stick welder. It has a lot of power and still works great.

This is the welding area & a small Mig welder:

This is probably my favorite tool - the flypress. It can do so many things, I could go on forever. I still find new ways to use it all the time.

Here are my sanders. I use them to deburr and sometimes reshape steel.

In the back area, I have my old Logan 10" lathe. It's seen a lot of use, but it's more than accurate enough for my purposes.

Finally, there's my little air compressor, surrounded by a bunch of projects. In the foreground, you can see the motorized beach cruiser I built- more on that later.

That about does it for the shop tour. Hope you enjoyed checking it out! Soon I'll show you how I use everything...
Subscribe to:
Posts (Atom)